MOTHER NATURE'S REVENGE
Storm chasing can be very dangerous, so we made sure that we had an escape route in case the storm became violent. While the summer heat was pressing down on me on the beach, I knew it was just a matter of minutes before the sky above me would be devoured by the vicious thunderstorm that rolled in from the sea.
Some friends and I were hunting for a good storm to photograph. We kept an eye on the Bureau of Meteorology Radar website, which shows maps of rainfall as it’s happening. The darker the reds are on the map, the more rain there is. Violent storms generally create lots of yellow, orange, red and sometimes black colors on these maps.
"We hurried to the location, and luckily our calculations proved right. We had time to watch this storm form."
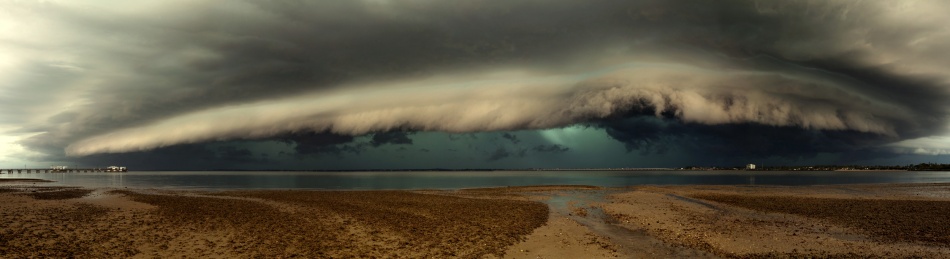
We wanted to get in front of a thunderstorm and photograph it as it crossed the coast. We were waiting for the storm fronts to join up to an intense show of nature’s forces. Once they did, we were able to use our local knowledge to help forecast which direction the clouds were heading. We hurried to the location, and luckily our calculations proved right. We had time to watch this storm form.It was a hot and still summer’s day when we reached the wide shallow bay called Bramble Bay, the estuary for the Pine River and Hays Inlet in South East Queensland, Australia. The location is situated near the Woody Point Yacht Club, and the Woody Point Jetty is visible on the left. A thunderstorm was approaching and it was eerily silent. The excitement was breathtaking. The front stretched many kilometers across, and I could see the impending cloud formation that we tend to call a "Guster" or a "shelf cloud."A thunderstorm was hiding at the core of this shelf cloud. The cool air from the storm clouds sink down and spread across the land, pushing warm air up, which is drawn into the storm’s updraft. The warm and moist air then hits the cold winds at the center and condenses into rolling clouds, dramatically warning viewers of the approaching thunderstorm.
"It's important to have at least a 30% overlap on each frame so that the images can be effectively merged in post-processing."
The storm wouldn’t fit into one image, so I decided to make a panorama. For panorama images it helps to use a tripod and cable release. I set the camera on Manual mode once I had the correct exposure settings. I then took my shots, moving the camera to gather all the information needed. It's important to have at least a 30% overlap on each frame so that the images can be effectively merged in post-processing. As the ferocious storm was getting threateningly close, I took the six images I needed for my panorama.Within less than two minutes after taking these photos, I was rushing for cover as the gale-force winds and heavy rain took over the sky above me. This storm image is from the first of my three attempts to capture dramatic storm images. The third attempt left my car covered in masses of hailstone pockmarks!
I made minor adjustments in Adobe Camera Raw, and then I exported the image to Photoshop to process the panorama.
1) In Camera Raw, I straightened the horizon of each image.
2) I exported the six images to Photoshop, and using the Clone Stamp tool, I removed some dust spots.
3) I used the Photomerge feature to join all the photographs automatically.
4) I added a Curves adjustment layer and then dragged the curves until I was happy with the contrast.
5) Using the Crop tool, the image was cropped to remove the jagged edges caused by the merging of the photos.
1) Research is the key to finding the right place to claim good photos, so look for information from storm chasing sites and weather sites in your area. Local knowledge can make or break the result of your shoot. If you're just beginning to take these kinds of shots, try to spend lots of time reading how others in your area have found their storms and how they plan for them.
2) Keep wet weather gear handy, for both yourself and your equipment. Don't rely on an umbrella!
3) If ever in doubt, get out of the line of fire. Save yourself and your gear for another day.
4) Keep an eye on the Bureau of Meteorology Radar site, which shows rainfall as it’s happening. The darker the reds are on the map, the more rain there is. Violent storms generally create lots of yellow, orange, red and sometimes black colors on these maps.
5) People have been killed while chasing photographs of storms, so please make sure you have access to all the warnings and understand the risks.