by Antonyus Bunjamin (Abe)
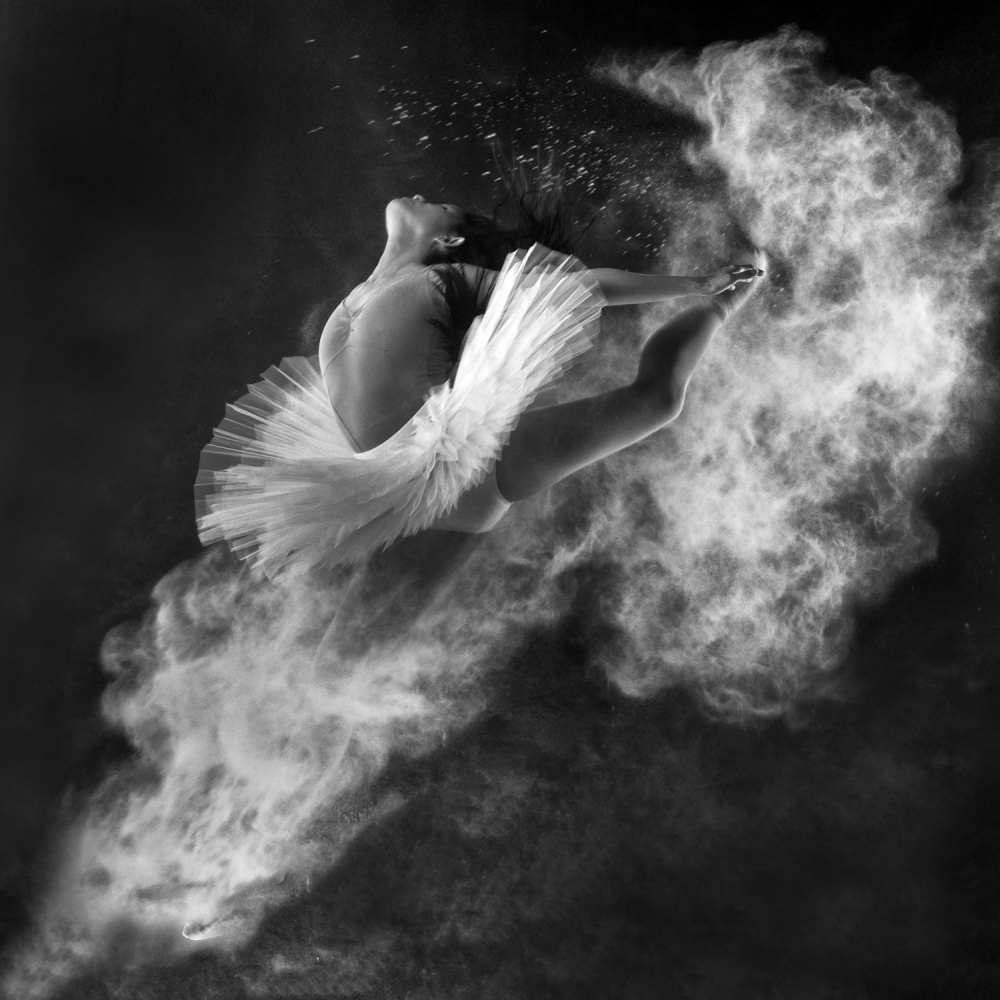
This photo was made because I wanted to experiment with powder photography. When it's done right, the effect resembles cloud formations, and by combining the movement of the powder with a model in motion, you can create quite a dramatic image.
Powder photography is a special effect technique that photographers use in conjunction with high speed movement and strobes to freeze the action. Various types of powdered substances, such as baby powder, talc, holi powder or flour, can be used while the model is in motion. To achieve a similar effect, the powder can be replaced with a smoke machine; however, that requires a different setup.
"It takes a while to get the timing down and capture the action in the split second that the lights flash, but eventually we made some great jumping pictures."
Nikon D7 100 . Nikon 28-300mm f/3.5-5.6G ED VR . 28mmmm . 1/160s . f/9 . ISO200
The idea came to me after seeing this type of work online, especially after I discovered a series of images called "Powder Dance" by photographer Geraldine Lamanna. I was inspired and decided to try my own version with a ballerina. For the set I used a large black linen cloth for the background, and I made sure I had a lot of bottles of powder at hand. I used three softboxes to illuminate the model and fired them with a wireless trigger on my camera. Before we started shooting, I explained to the model how I wanted her to jump and run as I photographed her movement. Timing is important in this type of work, and so is patience. It takes a while to get the timing down and capture the action in the split second that the lights flash, but eventually we made some great jumping pictures. To use powdered substances in photography it is essential to have a structured setup. A minimum of two lights is required, but I chose to use three to ensure that I would stop the action and illuminate both the model and the powder. The main light (a high-speed flash, in this case) was positioned in front of the model (on the right side of the set), and two lights were placed behind the model (on the left of the set) to create good backlight on the powder. There are two ways to create the cloud of powder: an assistant can throw the powder directly at the model at precisely the moment you press the shutter button, or you can cover the model's hair, arms, legs, etc. with powder so that when she jumps and moves her extremities, the powder will fly into the air. As a result, the photo will show the movement of the model with a dramatic smoke-like effect.
"Before we began the actual shoot, we studied the length of the ballerina's steps as she moved from one place to another so that we could fine-tune the timing."
The distance between the camera and the subject was about 10 to 15 feet (3 to 5 meters), and the width of the stage was approximately 25 feet (7.5 meters), which was necessary to allow the ballerina to move freely. Before we began the actual shoot, we studied the length of the ballerina's steps as she moved from one place to another so that we could fine-tune the timing. We noted that while she was spinning her steps overlapped, and we recorded the distance between steps when she jumped and when she ran slowly. I shot this frame when the model moved in a straight line, from right to left only. All three softboxes were set for continuous light when I pressed the trigger. We decided to throw the powder at the model, so when I triggered the shutter, my assistant tossed the baby powder/flour mixture at the model. I used a Nikon 28–300mm f/3.5-5.6G ED VR lens and positioned the camera to cover right-to-left movement in a single frame. I always shoot in RAW format so I can easily adjust the color and tones in Photoshop, and I shoot in continuous mode so I can capture three to five frames of the same action. Before you start shooting, use autofocus to focus on an object where the model will be in the frame (you can ask to your assistant to stand between the softboxes in the middle of the set), and then lock your lens by switching it to manual focus. When the model is ready, press the shutter button halfway and begin counting down. Your assistant should be ready to throw the powder at the same time the model jumps. At the end of the countdown, the powder is tossed and when the model jumps, press the shutter button all the way down.
The image was processed in Adobe Camera Raw, Photoshop and Nik Silver Efex Pro 2 plugin.1) I imported the RAW file into Camera Raw, converted it to a JPEG and then exported it to Photoshop. Under Image I selected Auto Tone, Auto Contrast and Auto Color.
2) To make some further basic adjustments, I opened the image in Camera Raw again and tweaked the settings in the Basic panel.
Exposure –0.35Contrast +37Highlights –200Blacks –19Clarity +36
3) I then exported the image back to Photoshop.
4) I wanted the final image to be a square format, so I selected the Crop tool, set the aspect ratio to 1:1 and cropped the photo.
5) The next step was to convert the image to black and white. I opened it in Nik Silver Efex Pro 2 plugin and applied the Neutral preset. On the right side of the interface, in the Global Adjustments panel, I increased Structure to 39%.
6) Back in Photoshop, I decided to remove some of the powder from the bottom of the frame and darken the floor. I first selected this area using the Quick Selection tool, and then I used the Clone Stamp tool to do some retouching and the Burn tool to make it black.
7) At this point I prepared the file for uploading to 1x. Under Image > Image Size, I always keep the Resolution set to 300 pixels/inch with a minimum of 35 cm (about 14 inches) on the widest side.
1) Pay close attention to the composition and get it right before you take the photo. Doing this always makes post-processing easier. Of course you can fix compositional errors in post-production using the Crop tool, but you should learn the technique of composing in camera instead of relying on cropping later.
2) Know what you want to photograph and how you will achieve it before the photo shoot to get the best results.
3) Even when you are fully prepared, the unexpected can happen. Don't blame the situation: think positively and you will find a way to resolve any problem that arises.
4) Always shoot in RAW format so you have as much latitude as possible when you are processing the image.
5) Don't delete any files until you are sure that you will not need them for your current project or for a future project. It's a good idea to start collecting images for your personal photo archives. Many times images that don't fit into your concept today come in handy down the road.
6) Never stop learning! There are so many resources on the internet to help improve your photography skills.
7) Don't ever be ashamed to ask for help from someone with more experience. Oftentimes they are happy to give you advice.
I'm from Indonesia and I am an architect. I admire the natural beauty of God's creation, and I try to capture this beauty in my work. I prefer black and white, nature, human interest and macro photography. As long as I live I hope to produce work that will be enjoyed by everyone who sees it, and I will continue to donate my work to help disaster victims and the sustainability of our environment. Using one's creative abilities to help others is a gift of God.