Photographing fireworks is very appealing to me. After taking many images with the classical long exposure, I decided to try high shutter speed, handheld images, just to see what I could come up with.
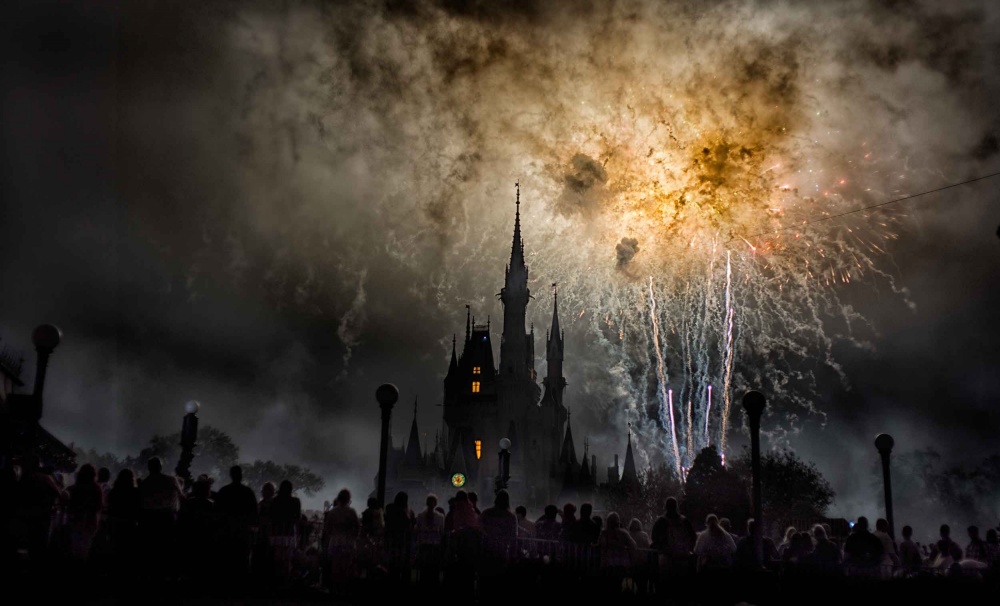
Visiting Magic Kingdom at Walt Disney World in Florida to see their fireworks display for the first time, I looked for a location where the castle was visible with enough space left in the sky. Since it was the Christmas holiday season the park was very crowded, so we arrived at the location a couple of hours before the fireworks began to make sure we had a good view with little chance that people would stand in front of us.
Sony A7R . Leica 35mmf/2 . 1/50ss . f/8 . ISO100
"Conventionally you shoot fireworks at the camera’s native ISO for best quality and minimal noise, take four-second exposures and set the aperture to f/11."
While I was editing other firework images from Magic Kingdom, the idea came to me to make a different type image. I noticed that in some images the castle appeared darker than in others, but it still had lots of color and detail. During the fireworks display, they changed the illumination of the castle, alternating between different colors, stars and making it completely dark, as in this case. Conventionally you shoot fireworks at the camera’s native ISO for best quality and minimal noise, take four-second exposures and set the aperture to f/11. The aperture will give you the proper light in the fireworks while the shutter speed will handle the detail in the castle (since it's much darker).
"These settings would also capture the smoke from the fireworks, giving the image the desired creepy look."
For the eerie effect I was looking for, I selected a setting that rendered the castle darker and was slow enough to capture the castle while it was unlit. The shutter speed had to also be high enough to produce a sharp handheld image. After some experimentation, I came up with an aperture of f/11, 1/50 second shutter speed and ISO 100. These settings would also capture the smoke from the fireworks, giving the image the desired creepy look.I had to take many frames since every one of them would have a different look. I found it important to have the two yellow windows prominent and the castle darkened. Finding a place to set up is crucial; for this shot I chose an area below the shown crowd with a natural barrier. It worked out well because no one could get in front of us or push me or the tripod while I was shooting.
I used Lightroom and Photoshop to process the image. Keep in mind that with a careful set up, there will be minimal Photoshop work involved.
1) Most of the work for this image was done in Lightroom. First I used the Crop & Straighten tool to straighten the image. Cropping was minimal since I chose a good location and focal length.
2) To adjust the overall exposure, I selected the Adjustment Brush with a soft setting (85) and made sure to check the Auto Mask box. I painted over the crowd, paying particular attention to only lighten the heads, shoulders and the areas just above them. The rest of the body should have a little subtle detail. The lighter area above the heads accentuated the silhouettes and enhanced the image visually.
3) I exported the image to Photoshop to adjust the sky and fireworks. Using the Curves tool (Image > Adjustments > Curves) I created a slight S-shaped curves, then I used the Selective Color tool (Image > Adjustments > Selective Color) and adjusted the Black and Neutral colors. These adjustments gave the sky the proper look and contrast.
4) To finish, I selected the three yellow windows and lightened/intensified the color just enough to make them more prominent. There was no need for noise reduction since I used a low ISO.
1) Scouting the location ahead of time is of great importance, and still you might only be gathering information the first time you shoot. I advise having two locations and moving after a few sets. Afterward, you can see the foreground of each and how well it incorporates into your plans.
2) Handholding the camera is important since you need flexibility. At the shutter speeds you will be shooting there is no need for a tripod as it will only get on your way, particularly if you choose to do some moving.
3) Once you have everything worked out, go to your location early — you don’t want anyone in your spot, and many people like to set up early.
4) There is something else you should do ahead of time, and it should go without saying: know your camera. You need to be able to make adjustments in the dark; using a small flashlight will ruin night vision.
5) Regarding focusing, if you are using an autofocus camera, set it to manual focus. I like to take advantage of the hyperfocal distance and focus just ahead of the crowd.
I live in Florida, USA. I have been shooting since the age of ten and started with a Leica 111f and two lenses. I have received some awards for my nature photos from NANPA (North America Nature Photographers Association photography). I have used SLRs, medium format and large format, always doing my own printing, both black and white and color. I specialized in underwater photography and then nature and birds for a number of years. I always shoot with my wife, Fabs; we both seem to take better photographs working as a team, giving each other inspiration and ideas.