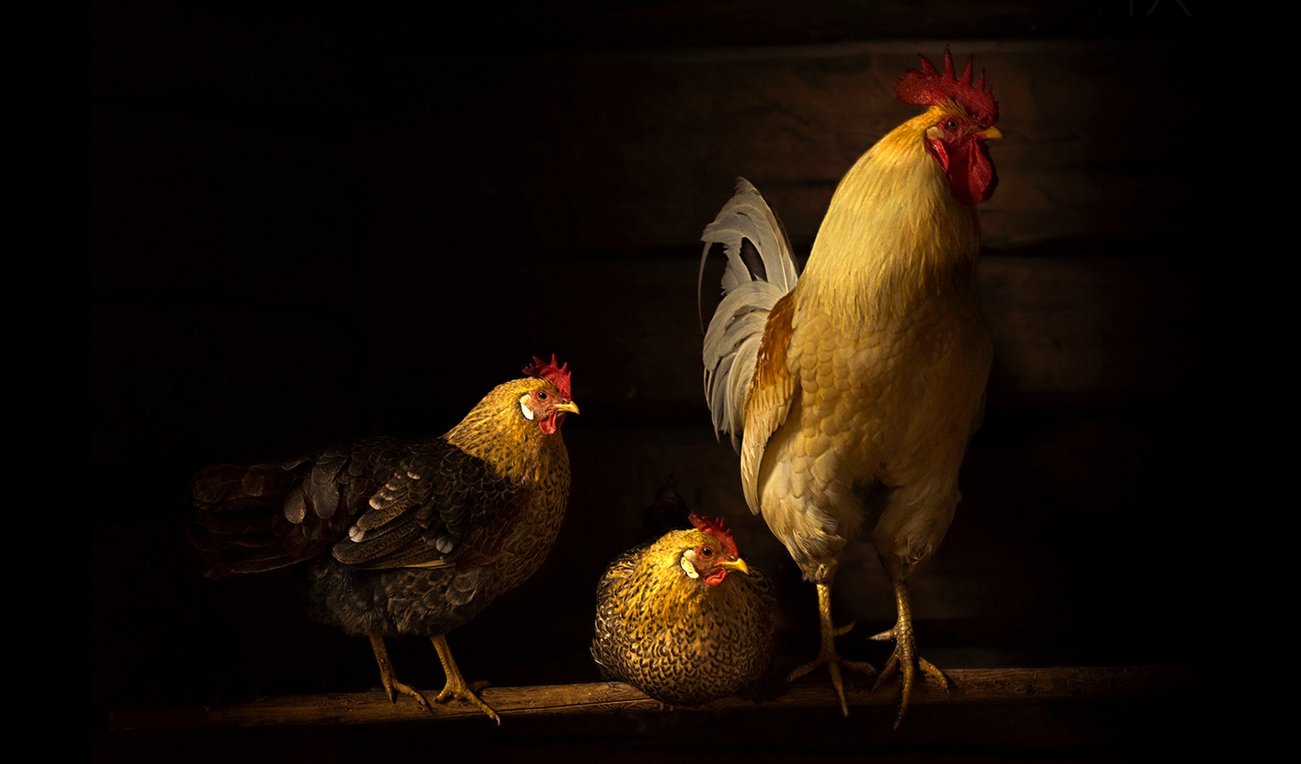
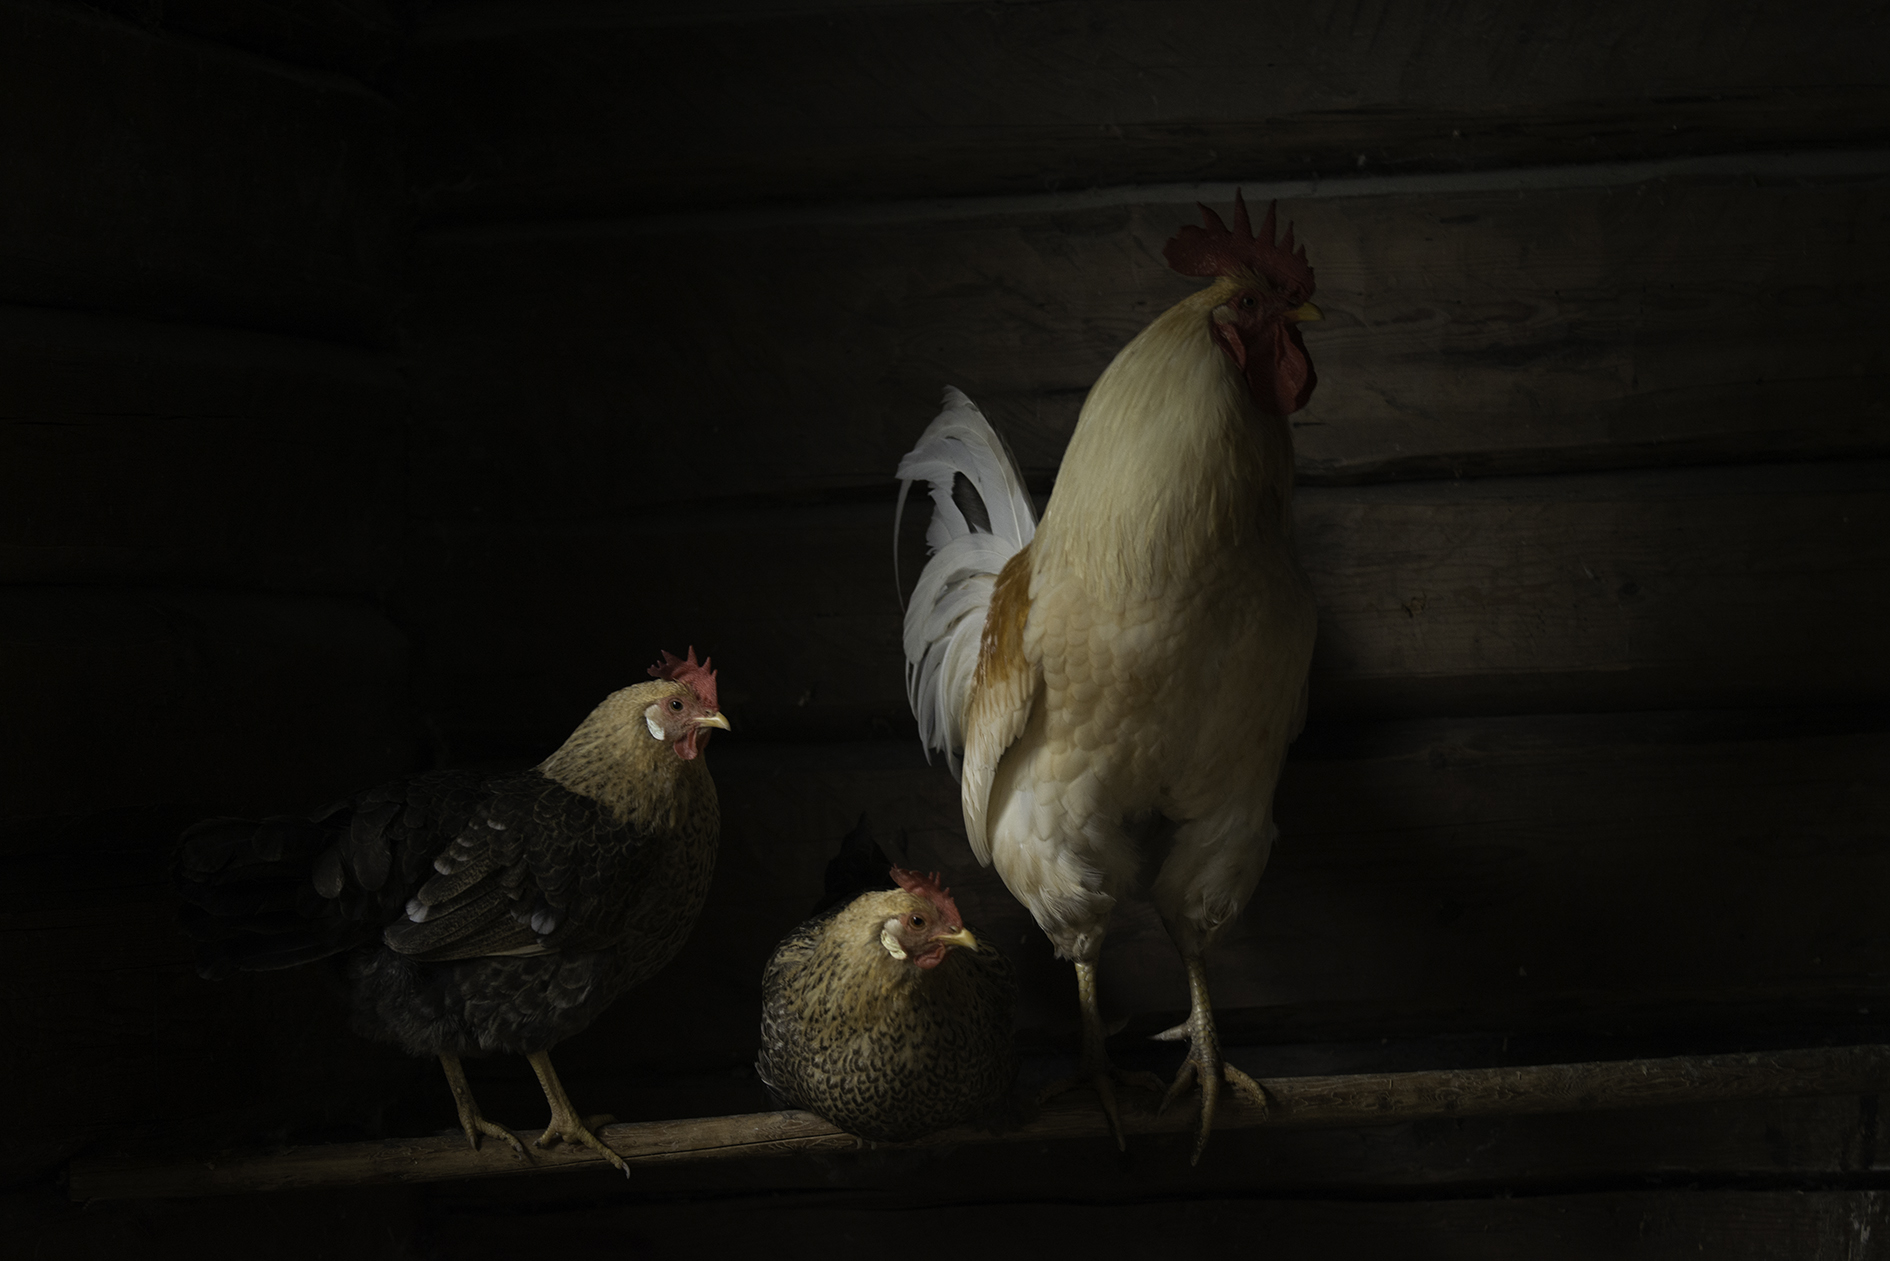
As with most photos, this one involved some luck. The chickens had to be in the right place at the right time, and it was pure coincidence that they all turned their heads in the same direction.
The room was dark and small, with light from only one window, making it somewhat challenging to get a sharp photo with a large zoom lens using a slow shutter speed. The wooden walls provided a great background with relatively neutral colors compared to the chickens.
Nikon D800 . Sigma 100.300mm f/4 . 120mmmm . 1/30ss . f/4 . ISO1250
I had brought my camera just to get a few snapshots, but as I opened the door to that room, I saw the chickens bathing in soft light coming from the window on the left. Knowing that they would soon start moving around, I had to kneel down and turn the ISO up to be able to use a fast enough shutter speed to avoid blur.
"I reviewed the photos on the camera screen, and this one already looked like a painting."
I zoomed in to fit the chickens in the frame and get rid of disturbing elements such as the window and a lamp hanging from the ceiling. By the time I had taken four photos, the chickens were all over the place. I reviewed the photos on the camera screen, and this one already looked like a painting. This was probably due to the texture of the feathers of the rooster, combined with some slight blurring from the slow shutter speed I had used. This photo was sharper than the others since the chickens were sitting still at that point. I knew I could enhance this painterly look even more with post-processing. This is a photo with some very nice colors and birds that knew how to pose for the camera. I am very pleased with the final result, and only wish I had been able to use a faster shutter speed to get even more detail in the feathers.
1) I always make the basic adjustments in Lightroom and the final touches in Photoshop, as I feel that I have more freedom and control there. As I always shoot in RAW format, the photo looked dull and unsaturated in Lightroom.
2) I increased Exposure slightly, as well as Contrast, Highlights, Whites and Saturation.
3) I reduced Shadows and Blacks to make the outer edges of the background less visible, forcing the viewer to focus on the chickens instead of being distracted by the details behind them.
4) Opening the photo in Photoshop, I knew that using layer masks would allow me to edit certain parts of the photo without affecting others, just like using a stencil. In total, I used six adjustment layers, each with their own layer mask: one for Levels, one for Exposure, and four layers for Brightness/Contrast. The four Brightness/Contrast layers controlled different parts of the photo. The background was darkened, and the contrast and brightness were increased on all three chickens. Some of the adjustment layers affected only their heads, slightly increasing the brightness, while another layer only affected their legs, making them brighter to avoid the impression that the legs were cut off due to the very dark shadow.
5) To further increase the painterly look, I made a layer mask that affected everything but the chickens and added a Field Blur filter. This blurred the background, removing a bit more detail. In my opinion, it further contributed to the look of a painting and created a contrast between the crisp feathers and the soft background.
6) Finally, I added some slight sharpening to the chickens, using yet another layer mask to avoid sharpening the already blurred background.
7) After editing, I posted the photo on several critique forums to get feedback. After a few days I started to notice certain mistakes I had made (I had probably been too eager to publish), such as a green tint across the entire image. This was easily adjusted with the Color Balance tool in Photoshop.
8) A final cropping of the photo finished my work.
1) Stay calm when photographing animals. They will forget about you and do their own thing, as long as you do not scare them.
2) Be quick on your trigger finger. Animals move around and rarely sit still for longer than a few seconds. Do not miss the moment!
3) Know your tools. Knowing what is possible in post-processing and which buttons to press will allow you to see opportunities instead of obstacles.
I am a 26-year-old Norwegian currently living in London, where I am writing my master's thesis in geology. I try to do as much photography as possible, although my studies take up most of my time. I started out with a Nikon D300 about six years ago, and since then I have tried to learn as much as possible about photography and editing. I am self-taught, and I usually try to make photos that represent what I experienced at the moment when I pressed the shutter release on my camera. As a rule, I always try to find flaws in my own photos and figure out ways to avoid them next time I shoot.