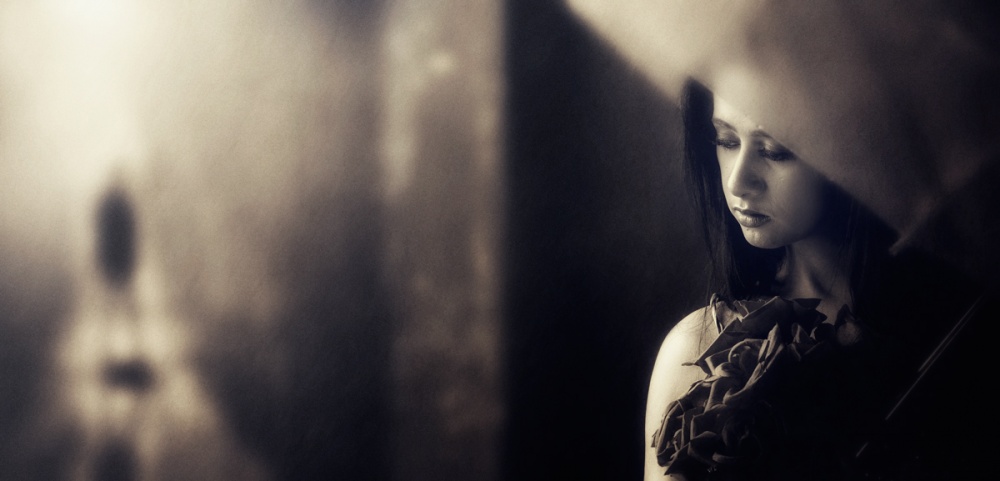
"SEPARATED"
by rooswandy juniawan
This is photomontage of two images that I combined in Photoshop. The idea behind the photo was to show the mood of two people who love each other but are separated by something that cannot be explained, so they cannot be together. It's a story most everyone can relate to at some point in their lives.
Nikon D90 . Nikkor 18-105mmf/3.5-5.6G . 1/100s . f/7.1 . ISO400
The photo shoot took place in an old abandoned building in the Old Town area of Jakarta. The buildings in this area have many windows that create dramatic lighting effects, and the dilapidated walls add to the dramatic atmosphere.
"Two different locations were required to make the composite: a window for the photo of the woman and a hallway with an overhead skylight for the photo of the man."
We shot in the afternoon, knowing that there would be plenty of light to illuminate the subjects. Because the natural light was reliable, there was no need to bring artificial lights, so I only needed my camera and tripod. Two different locations were required to make the composite: a window for the photo of the woman and a hallway with an overhead skylight for the photo of the man.In Nikon cameras, there are two RAW formats to choose from: compressed (lossy) or uncompressed (lossless). There isn't a drastic difference between the two, but the uncompressed file is slightly larger. For this reason, I shoot in compressed RAW 12-bit format. Whichever you choose, you will find that shooting in RAW format is very useful when you process your images in Lightroom, Photoshop or any other photo editing software. The RAW file will have more detail, smoother gradients, richer shadows and the list goes on. When you edit a RAW file, any processing (conversion to black and white, crop, exposure correction, etc.) will be stored as separate information from the original file, so the original RAW file will always remain unaltered.
"I wanted to create a certain drama in the image, and implying that it was raining outside accentuated the loneliness and despair that I wanted to portray."
To photograph the female model standing in the window, I added an umbrella to the scene as a prop. I wanted to create a certain drama in the image, and implying that it was raining outside accentuated the loneliness and despair that I wanted to portray. I chose to photograph the male model in a hallway that had a skylight directly above him. The light coming through the skylight created a long, dark shadow on the floor, intensifying the ambience and adding an element of solitude and division between the two people, which was my intention for the final composition.As for the camera settings, I used Manual mode to make it easier for me since I had full control over the rest of the settings, such as shutter speed, aperture, ISO and white balance. This mode provides the most flexibility while I am shooting because I can change any of the camera settings quickly as the lighting situations change. I set the lens to manual mode and used spot metering, allowing me to focus on the center of the image, get an accurate meter reading on that specific area and make precise exposure adjustments in the camera accordingly.The image was processed in Photoshop CS6.
1) I combined the two layers in one document.
2) I then applied some blur to both the umbrella and the male model. This directed more attention to the woman.
3) I converted the image to black and white by applying a Black & White adjustment layer and then moving the color sliders until I was satisfied with the way it looked.
4) Next, I added a sepia tone to the image.
5) I applied some sharpening, especially on the female model's face, leading the viewer's eye to her expression, which instantly conveys the solemn mood.
6) To improve the composition, I cropped the photo.
7) In the end I added a subtle rain effect to complete the overall mood. I created a new layer, filled it with black and then applied some Noise (Filter > Noise > Add Noise) and some Motion Blur (Filter > Blur > Motion Blur). I decreased the layer Opacity by moving the slider to the left so the layer became somewhat transparent.
1) To create an image like this, you first need a window facing north or south. This will provide a soft, indirect light throughout the day and not just during the golden hours. Then, you need a room with lots of windows, preferably large, floor-to-ceiling windows, and if they have window blinds, remove them. Also, make sure you turn off all of the interior lights before you start shooting. Most often artificial lighting clashes with natural light, causing color balance issues that you will have to correct in post-processing, and if it is strong overhead lighting, it can create unattractive shadows under the eyes.
2) After you set up the room, you need to position the model. As a rule, facing the main subject toward the window works very well. Use spot metering in the camera and then take a meter reading on the model's face to obtain the optimal exposure of the skin tone. What if you want to incorporate a window into the background? This creates a more difficult lighting situation since the model will become backlit, producing an overexposed background while the face is underexposed. You can of course completely avoid this situation, but there are a couple of options to resolve the issue. You can take a few different exposures and use HDR techniques to blend the images in post-processing or you can use a fill flash on a low setting to illuminate the face and overcome the underexposed skin tones.
3) Not all rooms are suitable for photographing a model in natural lighting. If you want to use 100% natural lighting, then you need experiment by taking some test shots before actually using the room for a photo shoot. Also, if the room only has an east- or west-facing window, it may give you too much harsh, direct light. You can still use this lighting, but you must be careful when you are positioning the model.
I live in Palangkaraya, Indonesia. I'm married and have three kids. I work as a civil engineer for the Central Kalimantan Government. I have loved photography for a long time, but I became much more serious about it around mid-2013. When I started shooting, I made so many mistakes and I ended up with very ugly pictures. But I never gave up and continued to practice to perfect my skills, always trying to get the best results.