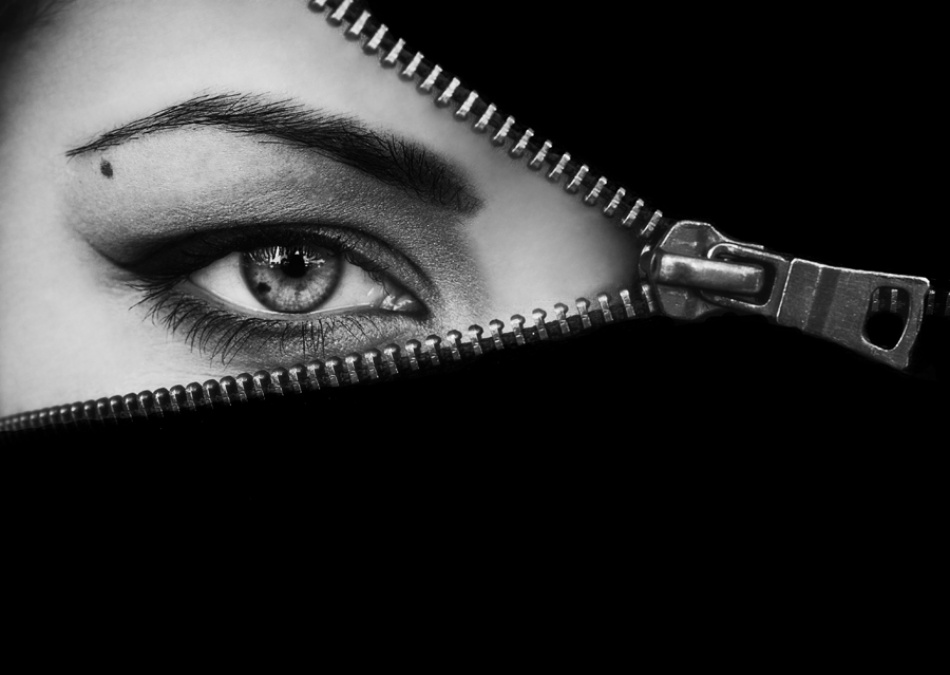
I don’t have a studio, and most of my models are friends of mine who are willing to have their photos taken. That was the case with this photograph. In fact, she knows all about photography and makeup, too — very convenient! We just had to find a place to shoot.
This picture was taken on a sunny winter afternoon somewhere near an underground station using natural light. It was more or less an improvised photo session. My friend who modeled for me in this photograph is an amateur photographer herself (and fortunately, a great makeup artist too). She had seen some of my work prior to our shoot, and she especially liked a picture I had taken in which the model was covered by a hood with a zipper, and only the model’s mouth was visible through the opening.
"I also made a color version of this image, but in the end, I preferred the black and white version — I think it is more dramatic and focuses more on her facial features. I find that color is sometimes a distraction."
She wanted me to take a similar photo of her, but I suggested we try something slightly different. Since she has such beautiful eyes, I suggested we do something similar, but allow one eye to show. She was wearing a black hoodie with a zipper, so I asked her to hold it up close to her face. This was the last frame we took that day, and it turned out to be the best one! I also made a color version of this image, but in the end, I preferred the black and white version — I think it is more dramatic and focuses more on her facial features. I find that color is sometimes a distraction.
I used Adobe Camera Raw and Photoshop CS5 to process the image.
1) I always shoot in RAW format, so I first opened the picture in Camera Raw and adjusted the sharpness by sliding the Clarity bar to 60. This gently sharpened the image without overdoing it.
2) Naturally, this sharpening process can bring out all the imperfections in the skin, so I then had to undergo a skin smoothing process. I copied the layer and used the Healing Brush tool (Hardness set to 100% and Spacing set to 25%) to sample a clear area and cover the entire face surface with it. I was careful to not smudge the area around the eye and the eyebrow or around the zipper and hairline.
3) Then I reduced the Opacity of this layer to 75% and merged the two layers together.
4) Next was to apply a bit of Dodging and Burning. I set the Dodge tool (Range set to Midtones and Exposure set to 12%) to make the white of the eye clearer. I also Dodged the iris by repeatedly dodging in circular motions, making sure I did not affect the darker parts of the eye such as the pupil and the outer part of the eye.
5) I then used the Burn tool (Range set to Shadows and Exposure set to 5%) to darken the pupil, the outer part of the iris, the eyebrow and eyelashes. I did this to increase the contrast of the eye.
6) Although the sweater was originally black, the light made the color uneven and the woven pattern was also visible. So I used the Burn tool (Range set to Shadows and Exposure set to 80%) to brush over it several times. I set the Hardness of the Brush to about 60%, which made the Brush more precise and prevented smudging the blacks onto the zipper.
7) Finally, I used the Sharpening tool with a Strength of 5% to sharpen the eye a little further.
1) Be very careful with Dodging and Burning! Do not set high values to these tools because you can easily ruin the photo that way. It is better to set lower values and take your time brushing over the area until you get the result you’re after.
2) When Dodging the white of the eye, be very careful to not Dodge the surrounding skin area; this will make the skin look unnaturally light. You can use the Quick Selection tool to select the white of the eye and use a hard Brush (Hardness set to 50% or 60%) so you do not smudge the skin. Alternatively, you can make a copy of the layer, make all the necessary changes, and then use a layer mask to hide any unnecessary or excessive whitening.
3) Using the Burn tool to black out something completely (such as the background or the sweater in this photo) can be very tricky. Even if you use the tool at 100% Exposure, it can leave grey areas that are more visible on some monitors than others, depending on the monitors' brightness settings at the time. To avoid this, once you have Burned the area, you can increase the Brightness of your monitor to 100% and this will reveal any areas that haven’t been thoroughly blackened.
I’m an amateur photographer from Greece. I’ve also lived in England and Spain, and I love traveling because it gives me the chance to photograph new people and places. A language teacher by profession, I’ve had a love for photography for several years now. I prefer conceptual portraiture since it gives me the opportunity to make up my own stories and context for the people I photograph, but I also enjoy architecture and street photography. I like editing my photos in Photoshop: this image editing tool allows me to give my photos a more personal touch, and it helps me create images of the world as I like to see it.