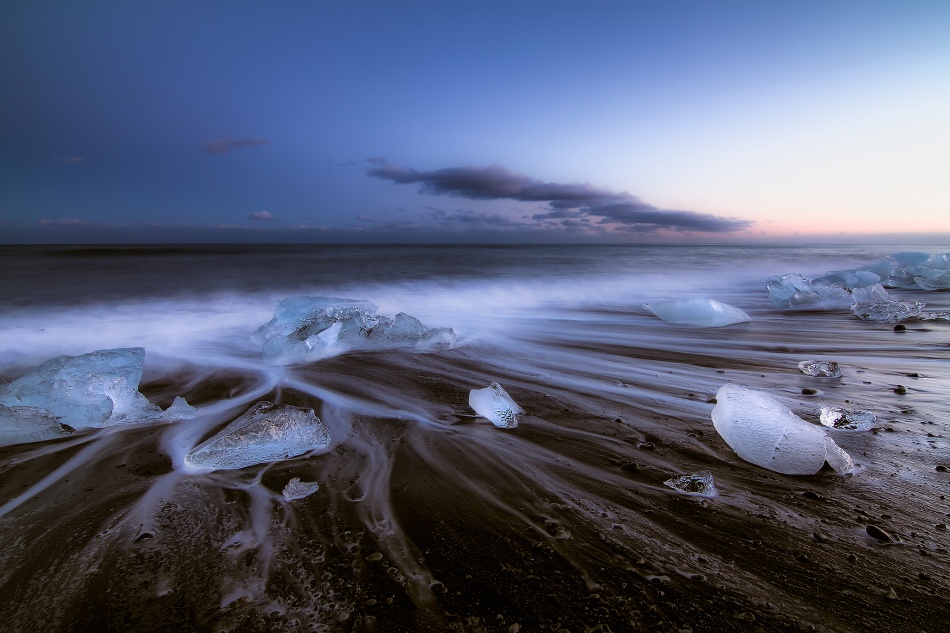
I had previously visited this area in Iceland, so I was familiar with the unique interplay of surf, sand, sky and icebergs. After careful research, I planned a trip to Iceland in March when all of the conditions would be optimal — lots of ice and the right waves in the sea.
Canon 7D . Tokina 11-16mmf/2.8 . 11mmmm . 4ss . f/63 . ISO100
The idea for this image had been growing in my mind for almost a year before I was able to realize it. I wanted the moving water to be rendered as filmy streaks rather than crisp droplets. This would require a shutter speed of 3–4 seconds. To get such a long shutter speed, I had to use a 10 stop neutral density (ND) filter (B+W ND 1000x). The other consideration was the timing of the shutter release. After some trial and error, I found that the best time to open the shutter was when a wave started to recede and the ice blocks were relatively steady.
"ND filters with 10 stops look like black glass and do not let enough light through for metering or autofocus, so you have to set up everything first and then put on the filter."
Before adding the filter, I composed the image in the viewfinder and made sure the tripod was secured. I focused on the nearest iceberg and then switched to manual focus, taking care not to disrupt anything. ND filters with 10 stops look like black glass and do not let enough light through for metering or autofocus, so you have to set up everything first and then put on the filter. To avoid vibrations that would cause blur, I used a cable release (Canon RC-6) with a 2-second delay and the mirror locked up. I am very happy with the resulting image. It really fulfilled the vision that had been haunting me for a year, and I am glad that I let the idea develop fully before rushing in and taking the picture. I never got tired of looking for photographs in this place, and each picture refined my vision. A print of this image has been decorating the wall of my living room for some time now. I think it captures the essence of this wonderful place, and I encourage any landscape photographer to visit this surreal island if they have the opportunity.
The first, basic adjustments to the RAW file were made in Adobe Lightroom 4, and then the image was exported to Photoshop to make the final adjustments.
1) I began in Lightroom 4, adjusting the Basic sliders as follows: White Balance 7450 K, Highlights –45, Shadows +65, Blacks –64 and Whites –68.
2) I then opened the image in Adobe Photoshop. First I created a duplicate layer and used a High Pass filter with Radius 5. I set the blending mode to Overlay and applied a layer mask. This created a strong sharpening effect, but the layer mask limited it to desired areas such as the icebergs.
3) I applied a Curves adjustment layer with a reverse S-curve to enhance the light in the foreground and add contrast to the trails left by the water foam.
4) Next I added a Levels adjustment layer to enhance the light on the icebergs and at the horizon. I applied a layer mask to exclude the rest of the image from that effect.
5) Finally, a Soft Gradient was applied to the sky to darken it a bit more and to balance it with the rest of the image.
1) Take your time finding the perfect vantage point, and remember that your composition is all about telling the story in your mind. The first spot you come to may not be the best — be ready to move around.
2) Be patient with waves. As any surfer will tell you: every wave is different, and some waves will just be prettier than others. Different places on the beach will also have different amounts of spray and foam from the waves, and it will take some patience to find the perfect balance.
3) Experiment with different shutter speeds. Longer speeds result in a milky, calm appearance, whereas shorter speeds give the impression of action. I prefer 3–5 seconds, but your own subject and taste will, of course, dictate your desired effect.
I live in Gijón, a small town in northern Spain. As an amateur photographer, I have a strong inclination toward both natural and urban landscapes, although I do enjoy other types of photography. Despite always being interested in photography, I did not get my first SLR until after my young son, Alvaro, turned four years old. Since then, my main photographic subject has been the stunning landscapes of the Asturias.
I am always seeking to explore new landscapes and to find the perfect image.